Project 6: Path Planning via Visibility Graph
- Assigned: Suday, November 17
- Due: as soon as you can after the break
- Group policy: Partner-optional
- Collaboration policy: Level 1
In this project you will implement geometric motion planning for a point robot moving among polygonal obstacles in 2d using the visibility graph (VG) approach.
Overview
One of the fundamental problems in robotics is motion planning: given a robot moving in an environment (or: physical space), a start position and an end position, find a path so that the robot can move from start to end, without collisisons. Generally speaking, in most situations we are happy to compute just a path, not necessarily the optimal/shortest, but in some special situations we are able to compute an optimal (shortest) path.
In this project we’ll make some simplifying assumptions which will allow us to do optimal planning:
Physical space is 2D: The environment is 2D.
Point robot: the robot is assume to be a point (not realistic, but a good place to start).
Obstacles: The obstacles consists of a set of 2D polygons. Furthermore, we assume that the robot is moving in a large bounding box B that contains all polygons.
Static: We’ll assume that the environment is static (the obstacles are fixed and do not move).
Known: The environment is known, i.e. the robot knows the list of obstacles with their vertices and edges. That is, the robot does not rely on sensors to learn the environment, instead the environment is given.
The general idea of motion planning is to construct a representation of the free space (the space free of obstacles where robot can move). The representation is refred to generically as a roadmap and is essentially a graph representing (movement through) the free space. Ideally we want to build a graph/roadmap so that:
- Any path in the roadmap corresponds to a collision-free path in the free space.
- Any path in the free-space corresponds to a path in the roadmap.
Essentially this means that if a path exists in reality, the graph will have it, and if the graph has a path, it exists in reality. Put differently, no false positive (graph finds a path, but path does not exist in reality), or false negatives (graph says no path exist, but path exists in reality).
If we are able to compute a road map of free space with these properties, then moving from a location s to a location t is corresponds to finding a path in the road map from s to t. Essentially we have reduced the motion planning problem to a path problem in a graph.
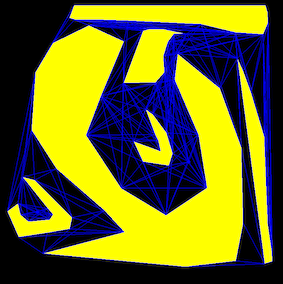
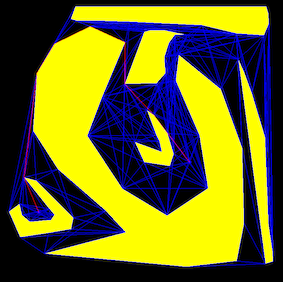
There are several types of roadpams that have been used, depending on the specifics of the problem. For a point robot moving among polygonal obstacles in the plane, it is possible to construct a type of roadmap that will allow to compute optimal paths: the visibility graph. This is a graph whose vertices are the vertices of the obstacles, and its edges (u,v) are all the pair of vertices that can “see” each other, that is, segment uv does not intersect the interior of any obstacle. Some screenshots above and below.
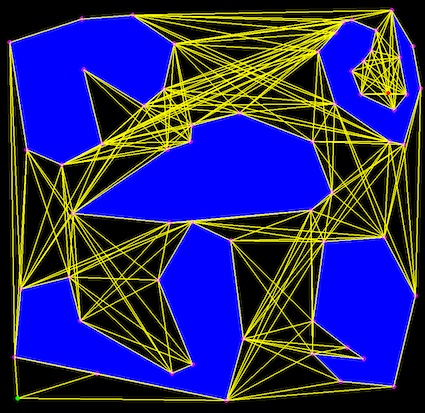
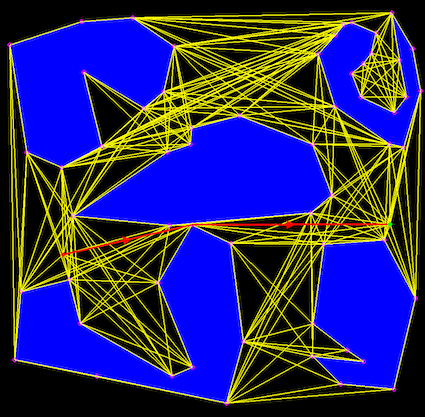
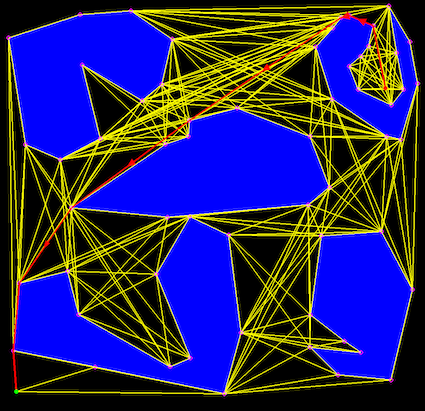
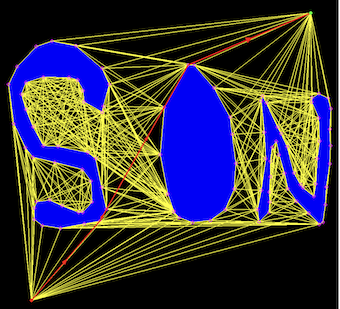
Shortest paths in 2D have the very nice and convenient property that they are straight lines, and they have to go through the vertices of the obstacles (a path that takes you to a point interior to an edge and then continues to a vertex is not shortest). This basically means that any shortest path will be contained in the VG. Once the visibility graph (VG) is computed, the shortest paths from start to end can be computed for e.g. using Dijkstra’s algorithm.
This project
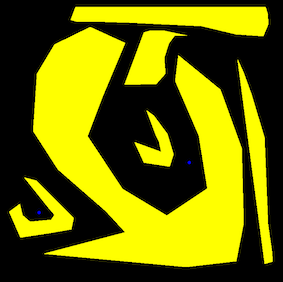
When you start your code, have a simple pre-set scene with a couple of simple polygonal obstacles (e.g. rectangles). Allow the user to reset the scene and and enter polygons using the mouse (in a manner similar to previous projects).
Once the scene is done, compute and render the visibility graph. Implement the straightforward algorithm that considers all possible pairs of vertices (u,v) and adds an edge to the visibility graph if segment uv does not intersect properly any edge of any obstacle. Additionally, if u and v are on the same polygon, you need to check whether segment uv is inside the polygon that contains u and v, and if so, not include it in the visibility graph.
Note that the edges of the polygons must be included in the visibility graph.
Don’t forget to add a vertex for the start/end positions and edges from start/end to all visible vertices of the polygons.
- Allow the user to click on the start and end position of the “robot” in the scene. Then, run Dijkstra’s algorithm on the VG and render the resulting path (for e.g. in a different color and different line width). Let the user enter different start and end positions and re-compute the path.
All the geometric primitives that you’ll need for this project, you already have them. So that part should work smoothly and quickly. The new part is implementing Dijsktra’s algorithm. In csci2200 we discussed the pseudocode for Dijkstra. In this project you have an opportunity to work through the details.
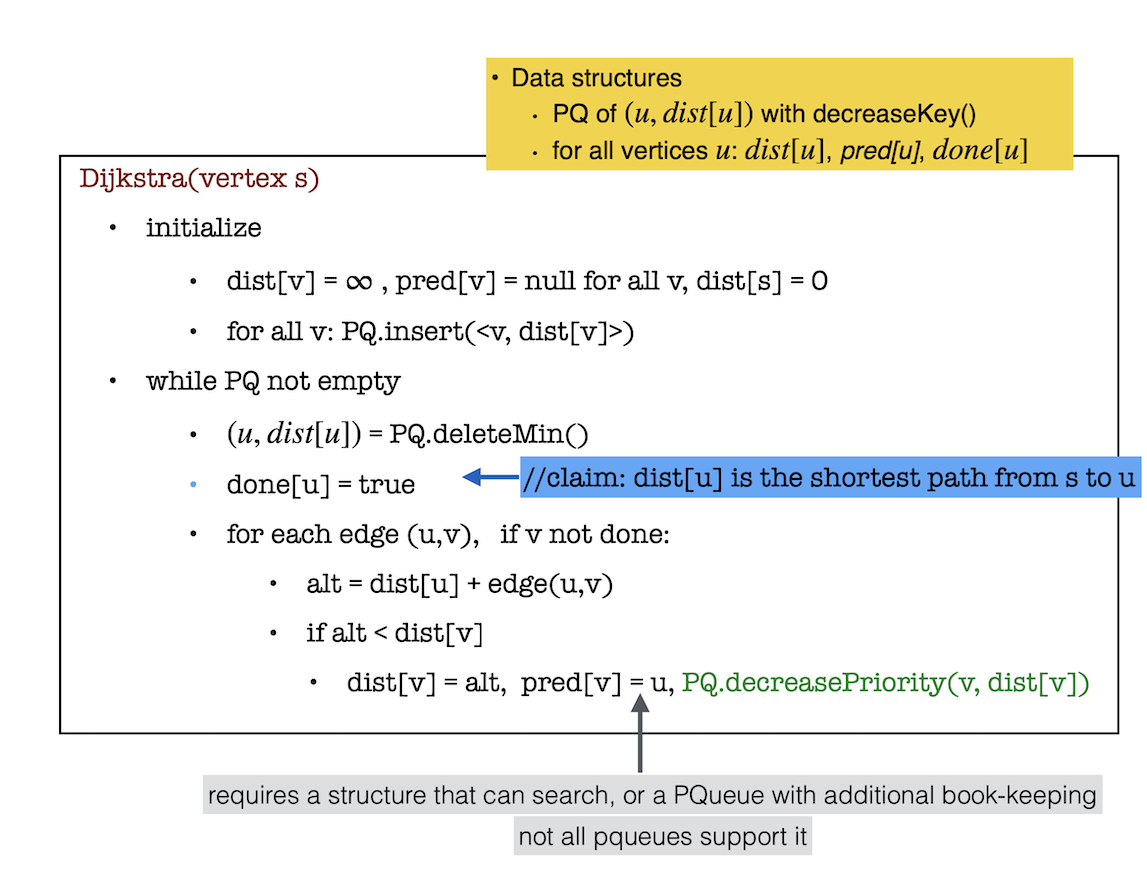
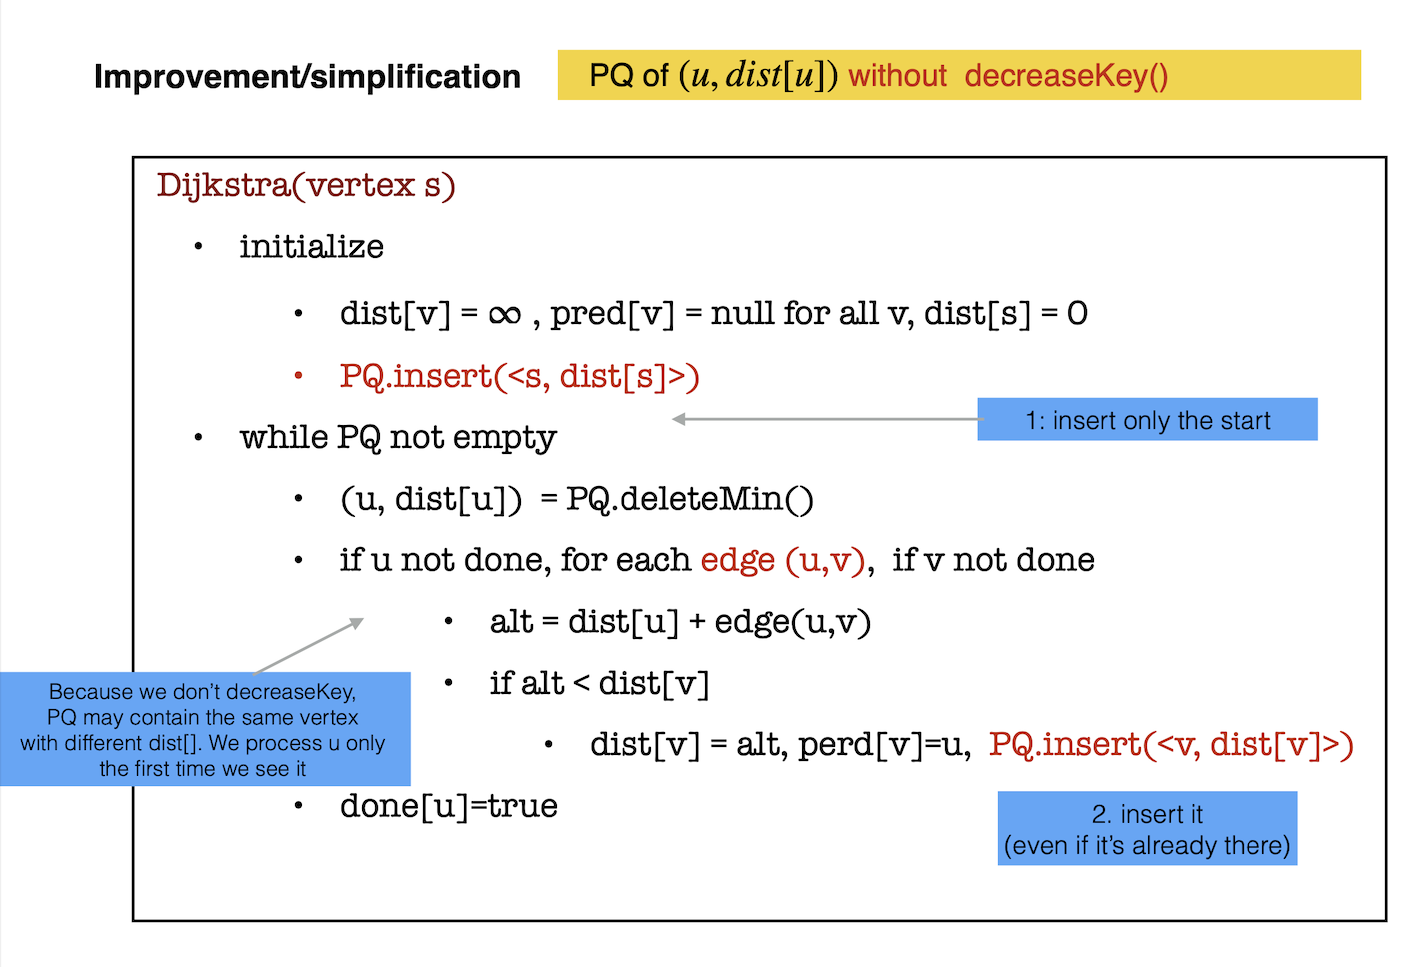
Dijkstra’s algorithm
Adjacency list: When we work with graphs we assume that the graph is given in an adjacency list form, that is, every vertex has a list of all the vertices that it has edges to. In other words, a vector of vectors. You want to think about this as you compute the VG. One way is to compute the VG directly into its adjacency list representation, and the other possibility is that when you compute the VG you create an array of edges, and after that you transform this into adjacency lists.
Once you have an adjacency list for the VG, you can use Dijkstra’s algorithm straight out of a textbook. We describe it below.
Dijkstra’s algorithm is a greedy algorithm to find the shortest paths from an arbitrary vertex (refered to as the source) to all other vertices in the graph. In our case we want the shortest path from start to end, so we run Dijkstra from vertex start until we reach vertex end, at which point we stop.
Data structures needed: for each vertex x, we keep track of:
- d[x] : this will eventually be the length of the shortest path from source to x
- p[x] : this is the predecessor of x on the shortest path from source to x
- done[x] : true if its shortest path has been found
We’ll also need a priority queue to store points and with their distance as priority: (x, d[x]).
At each iteration, we choose a vertex u which is not done and has minimum distance from source s. This node becomes done and d[u] is the length of the shortest path from s to u. All we have to do now is to update the distance to its neighbors which are not done.
Extra features
- Implement a point-in-polygon method and use it to detect if start or end points are inside an obstacle.
- Detect if a polygon is self-intersecting.
- Detect if polygons are overlapping.
- Draw the polygons filled. Note that openGL can only fill correctly convex polygons, so if you want it filled, you’ll need to compute a triangulation.
Deliverables/What to turn in
You will receive the assignment on GitHub; it contains no code. Your github repository shoud contain:
your code
The README file is the landing page for the repository and should contain: (1) a one-sentence description of what the code is doing. and (2) instrutions on how to run it. Totally fine to keep it minimal, but anyone shoud be able to run your code after looking at your README. It’s also good practice to include there the bugs or limitations of the project, so that anyone running is aware.
- A brief report showcasing your project, containing:
- (1) images of your visibility graph and paths. There isn’t a required number of images, include what you consider a representative sample.
- (2) if your code does not work in all cases, explain.
- (3) any extra features you implemented.
- (4) Time you spent in: Thinking; Programming; Testing; Documenting; Total.
- (5) Brief reflection prompts (you don’t need to address all): how challenging did you find this project? what are some things you learnt by doing this project? Is there anything you wish you did differently? If you worked with a partner, how did that go? Is there anything you would like like to explore further?
- Capture a movie of the screen while you demo your code and upload it to github as
demo.mov. To demo, no voice, just run your code and show what it can do (To capture a movie on a Mac pressshift+command+5and then choose the option that saysrecord selected portion).